MariaDB Plug-in
The MariaDB plug-in acts as a common MariaDB client application and provides access to MariaDB databases and tables. File system provided by the plug-in is organized as follows:
- Folders correspond to MariaDB databases. Folder attributes are not supported.
- Files correspond to tables. File attributes are not supported.
Since the plug-in provides no attributes for folders and files, it cannot be effectively used with incremental backup option, i.e. allows for differential backup only.
To learn how the software works with file attributes, please refer to Plug-in File Systems.
Format of the Backup Files
The software creates database dump files, one file per table. Each backup file is named after the respective table and contains all SQL statements required to create the table and fill it up with data. The format is very understandable and can be easily modified prior to restoration (provided that you keep the SQL syntax correct).
At present, the plug-in supports only the DROP-CREATE method that suggests that restoration of the backup will firstly delete database or table, and then rebuild it from zero.
Backing up
To back up a MariaDB database, follow these steps:
- Click the New Task icon on the toolbar.
- Select Backup task, and then click Next.
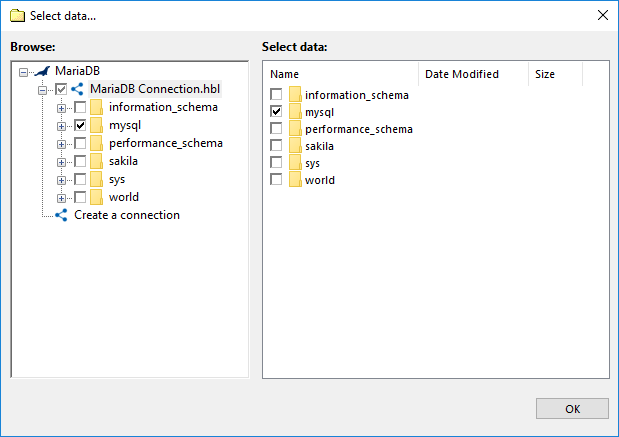
- Click on the MariaDB plug-in name in the Database group. The Select data... dialog will open.
- Select a MariaDB configuration, and click the plus [+] sign control next to it. When a connection is established, a list of available databases appears.

File system provided by the MariaDB plug-in. Folders are databases, files are tables.
Note: If you have no MariaDB configurations, then you need to create one. To learn how to do it, please see Creating MariaDB Configurations.
- Navigate through the list of databases by expanding and collapsing the tree structure through the plus [+] and minus [-] sign controls.
- Check the boxes next to the databases and tables that you want to back up.
- When finished, click OK.
- Click Next to finish data selection.
After selecting data for backup, you will need to select destination, enable compression and other options, and name the task. These steps are not specific to MariaDB, and you can find the respective instructions in the Backup Task chapter.
User Privileges
To browse the databases, select data, and run backups, the MariaDB user must have enough privileges to run the SHOW DATABASES, SHOW TABLES and SELECT statements for each object that you are planning to back up.