Backing up and restoring system drive

English

English

  • French
  • Russian
  • Spanish
HomeContact UsPartnersOnline Backup
CloseRegister

Login

Password

Backup Software
Download
Order
Support
About
  • Backup Software for Home
  • Handy Backup Home Standard
  • Handy Backup Home Professional
  •  
  • Backup Software for Business
  • Handy Backup Small Server
  • Handy Backup Network Server
  •  
  • Handy Backup for Android
  • Online Backup Service
  •  
  • Compare Versions
  • Screenshots
Backup Software
  • Handy Backup
  • Handy Backup Server
  •  
  • Handy Backup Plug-ins
  • Language Packs
  •  
  • Sources for Partners and Press
Download
  • Purchase Handy Backup
  • Upgrade Handy Backup
  • Help Me Choose Edition
  •  
  • Volume Order Pricing
  • Special Offers
  •  
  • Information for Resellers
  •  
  • Contact Sales
Order
  • Contact Support
  • FAQ
  • Handy Backup User Manual
  • How to Register
  •  
  • How to Back up
  • Backup Terms Glossary
  •  
  • Feedback Form
Support

Handy Backup / Support / Handy Backup User Manual / Managing Data with Handy Backup Disaster Recovery

Managing Data with Handy Backup Disaster Recovery

The program’s user interface is similar to Windows environment, where all data is available as folders and files. The top level, "Desktop", contains four objects:

My Computer. Contains all files, folders, FTP locations and other objects that can be used to create tasks

Tasks. Used to manage all operations. To back up or restore your data, you need to create and run the respective task

FTP Configurations. Allows adding and managing FTP connections, to use remote folders in tasks

Trash. Used for removing unnecessary elements, e.g. data selected for backup, FTP configurations, etc.

Mounting Hard Drives and Partitions

By default, Handy Backup Disaster Recovery automatically mounts all drives connected to the computer. You can also mount and unmount partitions using the GParted utility that comes with Knoppix. To do it, follow these steps:

  1. On the Knoppix Start menu, point to Preferences, and then click GParted.
  1. Select the desired device.
  2. Right-click the desited partition, point to Mount on, and then click the location offered to you by the system.

After that, the partition will appear in My Computer, and you will be able to use its files and folders in your tasks.

Navigation

Navigation in the environment is very simple and straightforward:

  • To open a folder, double-click it.
  • To go to the parent folder, click Up on the toolbar.

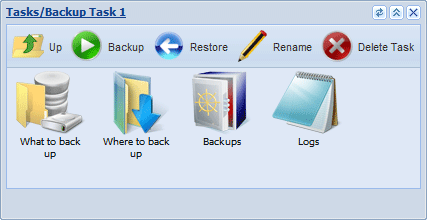
Toolbar is specific to each program’s object and contains all available commands. To perform an action, e.g. run a backup task, you need to click to open the task window, and click the respective icon on the toolbar.

Quick Start

Creating Backup and Restore Tasks

Go to Help Contents

Contact Us

support@handybackup.netsales@handybackup.net+1 (707) 703-13-11

Essentials

Installing Handy Backup

Installing Handy Backup Network Server

NEW!Installing Handy Backup Disaster Recovery

Installing Handy Backup under Linux

Updating Handy Backup from Earlier Versions

Registration

Plug-ins

How to Backup (Articles)

User Manual in PDF (version 7.1.2, 5.3 MB)

User Manual in PDF (version 6, 3 MB)

Who uses Handy Backup?

Loading client logos...

Copyright © 2004-2012 Novosoft LLC. All rights reserved. Handy Backup software.

Loading...

You are currently being redirected to a payment system. Please wait...

Back to Top