E-mail Plug-in
This plug-in performs email backups for messages from web services using the IMAP protocol.. The email plugin also allows you to automatically restore, duplicate or move email content.
Before Backup or Recovery
Many Web mail servers require an additional permission for using a local client (which Handy Backup is in this context). To give this permission, you can open your email account in a browser and click a button or mark a checkbox in account settings to give this permission.
Using the "E-mail" plug-in
To use the plug-in (on an example of Gmail backup here) please follow the instruction below:
- Create a new Handy Backup task. Select a backup task on the Step 1.
- On the Step 2, select the "Email" plug-in from "Email" group.
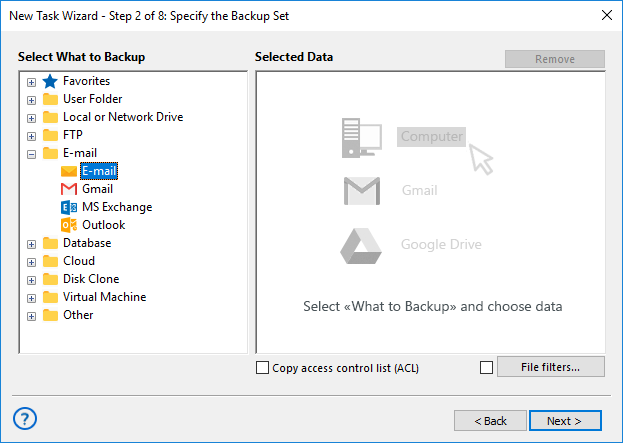
- In the appearing dialog window, create an email access configuration.
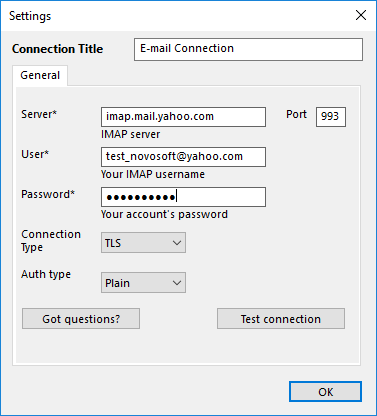
- Give your configuration some name, typing it in the "Configuration" string at the top.
- In the "IMAP Server" string, enter a particular IMAP configuration for your server.
For IMAP connections, the typical server name is
imap.(yourserveraddress)
or
mail.(yourserveraddress)
Here the (yourservername) is a substitution for your webmail server address, without parenthesis or any prefixes over the "imap".
- Enter the port number (the default port for encrypted IMAP is 993, for unencrypted IMAP is 143).
- Provide your username for an email account onto the appropriate field.
Note: The server can require either a short username (only a name before "@") or a full name with a server name after "@". For details about server name, please refer to a setup manual for particular server settings.
- Provide your password for an account or for Handy Backup app (the latter case is primarily for two-factor authentication) in the "Password" field.
Attention! You can create a password for Handy Backup through your Web mail settings. Usually, this function is among the "Security" options. Please keep the password strongly, as you cannot recover it by no mean if you lose it!
- Select the connection type according to your particular server requirements: TLS, StartTLS or other.
- Select an authorization type (you can learn what to use from a server settings or via the Internet). The default type is "Plain".
- Now you can either test your connection, open this page from the program, or just click OK and return to the plug-in window.
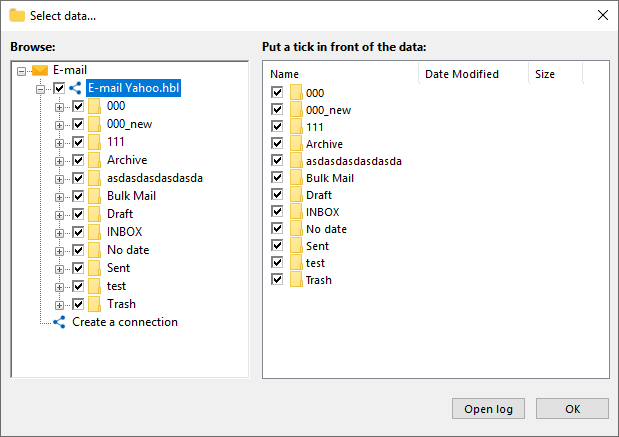
- You will see the plug-in window with email folders in an account you entered.
- Check/uncheck the boxes against the particular data you will plan to back up/exclude.
- Click OK button to return to the Step 2.
- Now you may add another data to a task; then proceed to next steps.
- All next steps are unspecific to webmail backup. Read the User Manual for detailing these steps.
Restoring Emails from Backup
The Email plug-in also allows automatic restoration. To do it, create a restoration task on the Step 1 of the new task wizard. Then select a backup vault on the Step 2 and find the file backup.hbi, which contains all the data about restoring email messages.
Duplicating or Moving Email Content
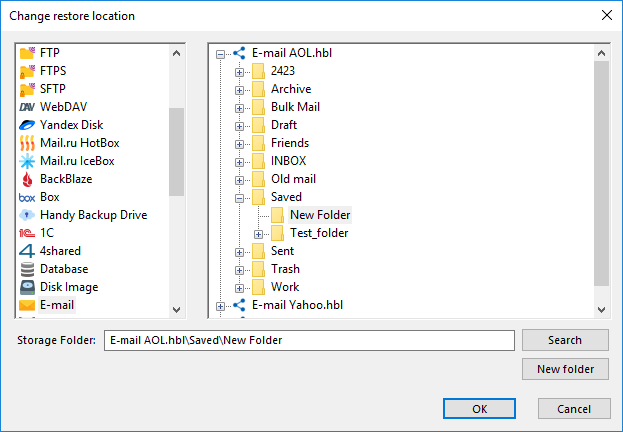
Sometimes, you may have a need to restore some or all of your messages to a different mailbox, or even to a different webmail server than an original copy backup. For these cases, click on the "Change restore location..." button in the restoration dialog when creating a new task, and select a new destination.
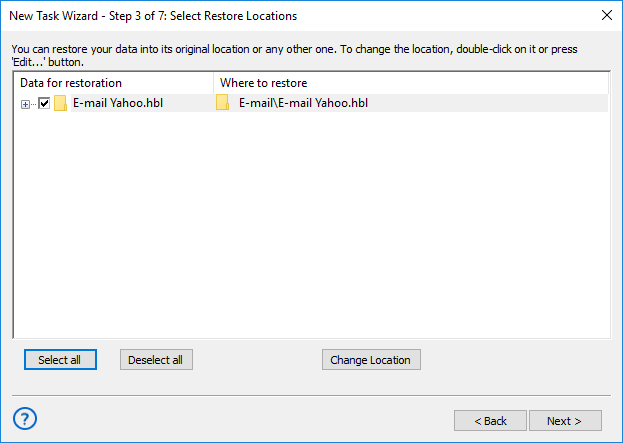
After selecting this option, you will see a data locations window. Select the "Email" plug-in, and then choose a new server to restore your data. We are strongly recommending saving the information moved to another server in a new folder – click the "Create folder" to do it!
Plug-in Architecture
The Email plug-in uses the IMAP protocol for data connection. Almost all modern webmail services, including Gmail, Yahoo! and Outlook mail, support IMAP. This protocol allows both backup and restoration of email bases.
Saving Email Backups
Handy Backup stores email copies in the dedicated EML file format, supported by many email local clients. Therefore, you can read, modify, sort or change the backups, assuming these backups are uncompressed and/or unencrypted. You can even restore EML just by moving it with a file manager!
Related Pages:
Contents: