With the default destination selected, both speed and simplicity of backup tasks are greatly increased. Using the default destination you have no more need to select the same storage repeatedly for your backup tasks.
Program Functionality
Updated on June 11, 2026
Applies to: Handy Backup
How to Remove Banners?
To hide banners from the program, you must have any paid edition of Handy Backup. Please use the next brief instruction to remove banners from the program.
- Open Handy Backup and click onto the "Settings" button on the main control panel.
- Select the "Updates" section on the left pane.
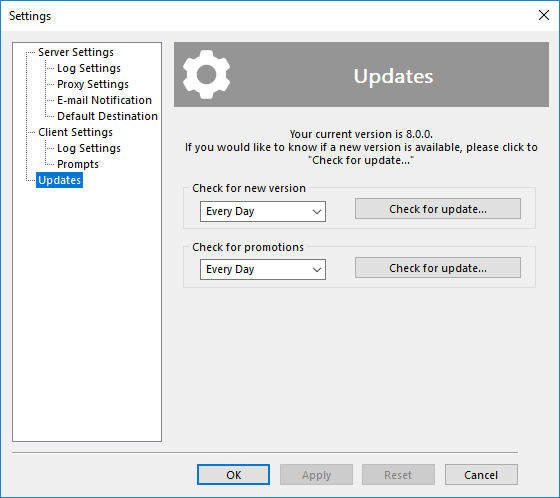
- In the drop-down list "Check for promotions", select "Never".
Note: If you are using Handy Backup 7 and do not want to get info about the version 8, select also "Never" in the "Check for new version" list.
- Click OK. Now you will get no more banners from Handy Backup, until resetting these parameters by some reason!
If you still have questions about banners in Handy Backup, please send us to [email protected], describing your questions or problems. We will be glad to help you!
Which storage types the program supports?
Please see which storage Handy Backup provides for data backups.
Handy Backup supports different methods for backup data storage:
- Local drives (in the Server Network edition, the local drives on remote computers);
- USB devices, flash pen sticks and memory cards like SD cards;
- NAS servers, mapped drives and shared network folders;
- FTP/SFTP/FTPS servers;
- WebDAV servers;
- S3 storage buckets (e.g., on Wasabi);
- Cloud storage (including Amazon S3, Box, OneDrive, Dropbox etc.).
Note: The program does not support tape backup for now!
Handy Backup allows making tasks for backup, recovery and data synchronization using the storage types listed here.
Learn more about back up to external drives or backup to flash memory drives
Which Backup Rotation Schemes the Program Supports?
Handy Backup allows making tasks to implement any backup rotation scheme, including such popular methods as:
You can implement any other scheme, such as 3-2-1 backup or simple FIFO queue, by using the flexible and powerful built-in task backup scheduler.
What Types of Compression the Program Supports?
In Handy Backup, compression of data copies uses the most popular ZIP format, for achieving greater convenience and availability of compressed data.
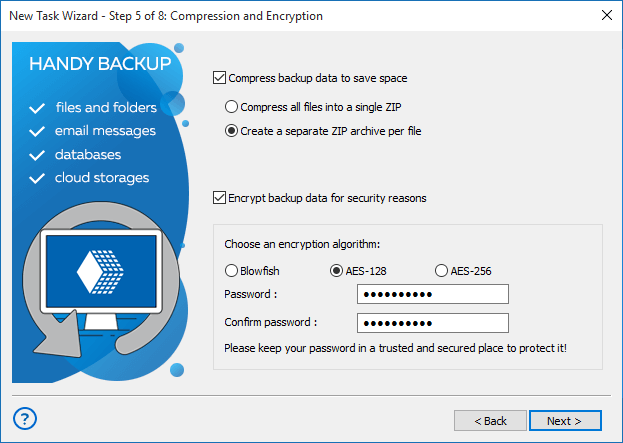
The program can either compress all data into a single ZIP archive or create a separate ZIP file for each source file, depending on particular task settings. You can select freely between these variants, according to your needs.
If you will create a ZIP archive and then modify a single file inside a backup dataset, the program then will rewrite all archive file. This feature allows rolling to previous version of a compressed archive (i.e. Handy Backup will keep an old ZIP file intact until you renew all backup completely).
Please learn more about backup data files ZIP compression.
Can I Use Hot Keys in the Program?

Yes, Handy Backup supports eight hot key combos for executing most frequent operations.
Note that most of these hot keys are common for most existing apps that are using GUI.
This option can be very useful for people with limited abilities (as an example, for persons with some visual impairment), helping them using Handy Backup conveniently.
Picture 1. Hot Keys in the Handy Backup.

Learn more about Hot Keys in the User Manual.
Can I copy files with paths longer than 256 characters?
If you're using Windows 10 version 1607 or later, you can enable support for long paths by following these steps:
- Open the Local Group Policy Editor (search for gpedit.msc in the Start menu) and go to "Computer Configuration > Administrative Templates > System > Filesystem > Enable Win32 long paths." Set this option to "Enabled."
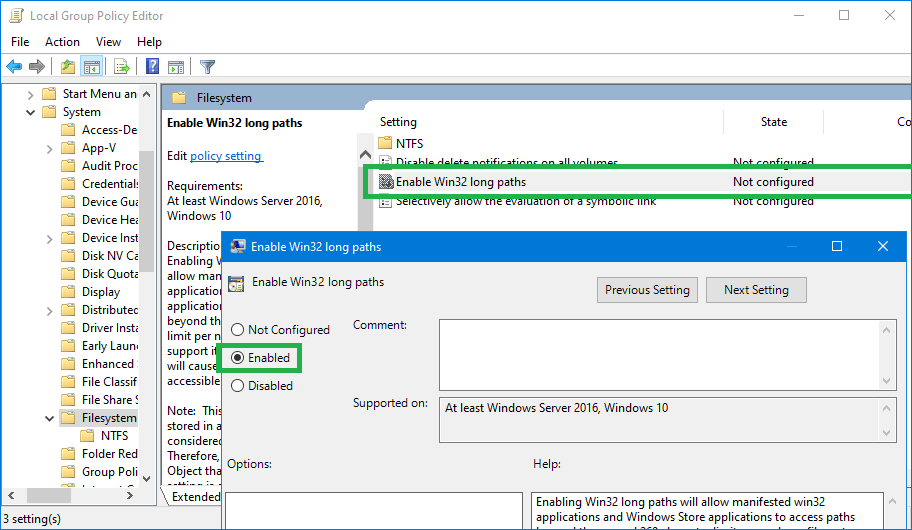
- In the Windows Registry, navigate to Computer\HKEY_LOCAL_MACHINE\SYSTEM\CurrentControlSet\Control\FileSystem\LongPathsEnabled and make sure it exists and is set to 1.

For versions of Windows 10 before the 1607 update, official support for long paths is not available.
Can I run a backup task from the command line?
Yes, you can run a backup task from the command line with Handy Backup. This is useful for automation, scripting, or running backups on remote machines without opening the graphical interface.
To do this, open the command line and navigate to the Handy Backup 8 folder. By default it's: cd "C:\Program Files\Handy Backup 8\"
If you installed the software in a different location, use that path instead.
Then enter the command:
hbcc.exe -e "[your-task]"This command will start the selected backup task.

After completion, Handy Backup will display one of the following messages:
- Completed with status: success — the task finished successfully.
- Completed with status: error — an error occurred during the backup.
Handy Backup is also a command line backup software, giving users the flexibility to run, schedule, and control backup tasks directly through the Windows command prompt.
With its command-line tool (hbcc.exe), you can execute predefined backup tasks, monitor their status, and integrate Handy Backup into scripts or automated workflows. This makes it a convenient solution not only for everyday users but also for power users and administrators who prefer automation and fine-grained control.
Default Destination: Your Personal Trusted Vault for Backups
Default destination is a data storage used by Handy Backup automatically when user has no want to select any other device to keep backups. User can select the most secured (or most comfortable) storage as the default destination, committing it the most of that user’s data backups.
How to Switch On the Default Destination
These are two ways to add the default destination option to your personal configuration of Handy Backup.
New Users: Use the Startup Wizard
If you are installing Handy Backup from scratch, just select your default destination in the Startup Wizard window.

The destination selected on this step will be your default destination.
Existing Copies of Handy Backup: Configuring the Default Destination
Open the program settings by using Alt+F7 keys or by selecting the “Settings…” item on the main menu. Go to the “Server Settings” -> “Default destination”. Then click on the “Change” button and select a default destination for your data.

Default Destination in Questions and Answers
Question (Q): I was selected the default destination with the Startup Wizard. Can I change it later?
Answer (A): Sure. Just go to the program settings as explored above for existing copies of Handy Backup. You can select a new default destination for your data at any single moment.
Q: If I change my default destination, how I can provide an access to my previous backups?
A: The previous default destination can be used as any other backup storage, regardless of its “non-default” status. So all your backup data will stay with you.
Q: How I can remove my selected default destination?
A: Just change it with the most typical destination you are using for backups.
Q: Can I save my backups to other storages when I have an active default destination?
A: Of course. Default destination is a feature, not a restriction. Selecting the data destination freely on a Step 3 of New Task Wizard overrides the default destination settings.

Q: I have some ideas about improving the default destination feature. Is it meaning?
A: Yes, it is great news! Tell us about your suggestions using E-mail [email protected], and we will be glad to improve our default destination feature. (We are also have a long tradition of gifts addressed to authors of most interesting and valuable ideas!)