Typo3 Backup Database and Content
Typo3 backup is an action that copies website content from Typo3 CMS, for both static data and dynamic Typo3 database. With Handy Backup, you can save a copy of Typo3 to any data storage, as well as make fast recovery, cloning or mirroring Typo3 sites.
Advantages of Typo3 Backup with Handy Backup
Simplicity of Exporting Data
With Handy Backup, you can automatically make Typo3 export for all content to any other section, server or even to
completely different software, as it presents a Typo3 backup dataset as collection of standard files, folders and SQL database tables in a readable format of SQL command sequences.
Extended Functionality of Website Typo3 Backup
With Handy Backup, you can not only create a full backup copy or clone of Typo3
database but also make partial (incremental, differential or mixed) backup, as well as save many version of the same website dataset.
You can also mark any Typo3 backup with time stamps.
Backup Typo3 Content with Protection
For saving Typo3 copies, you can use a protected transfer protocol and storage media
(such as S3 clouds or FTPS/SFTP servers), and add to this protection by running either internal (modified BlowFish) or external encryption algorithm.
This measure can protect your website copies from hacking or theft!
How to Backup Typo3 with Handy Backup
There is no dedicated TYPO3 backup plug-in in Handy Backup. Instead, you can use FTP-based plug-ins to download a TYPO3 static content, and then perform TYPO3 backup database of some type with an appropriate plug-in. To do it, please follow the next instruction.
- Open Handy Backup and make a new task by pressing Ctrl+N or by clicking on a "Create" button on the management panel.
- On Step 1, choose a backup task type and mark the "Advanced mode" to use all functions of Typo3 backup.
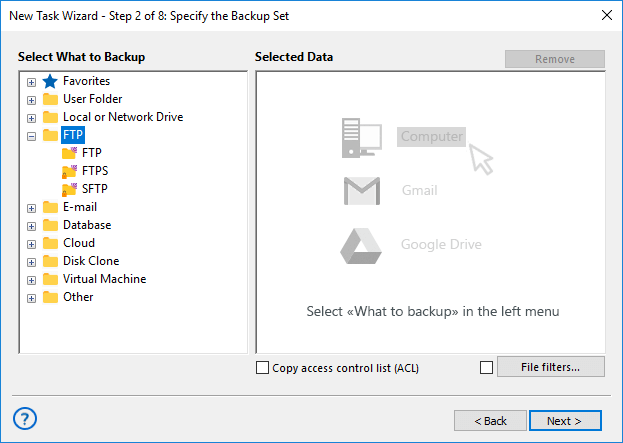
- On Step 2, open the FTP group and select FTP, SFTP or FTPS as connection option to connect your Typo3 static data.

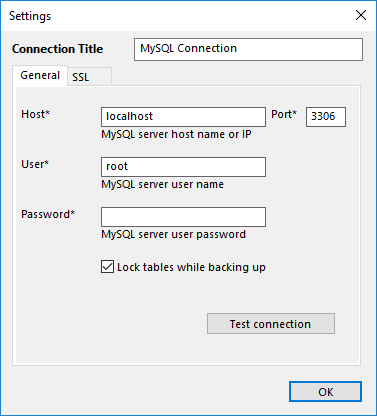
- Click on the "Create connection…" string. In the connection dialog, enter your Typo3 connection parameters. Test the connection.
- Click OK and then select your new connection. Choose CMS static data that you will plan to back up, by marking checkboxes against file names.
- Now return to Step 2 and select your Typo3 database engine in the Database group. Create a new connection as described above.

- Click OK and select your new connection name. Mark all database components that you plan to back up with checkboxes.
- On Step 3, select your data storage for Typo3 backup among different data storage plug-ins. Choose appropriate storage media for your backups and continue.
- On Step 4, select some full or partial backup method, tune versioned backup rotation and time stamps.
- On Step 5, you can choose to compress and encrypt your files with internal algorithms if you need.

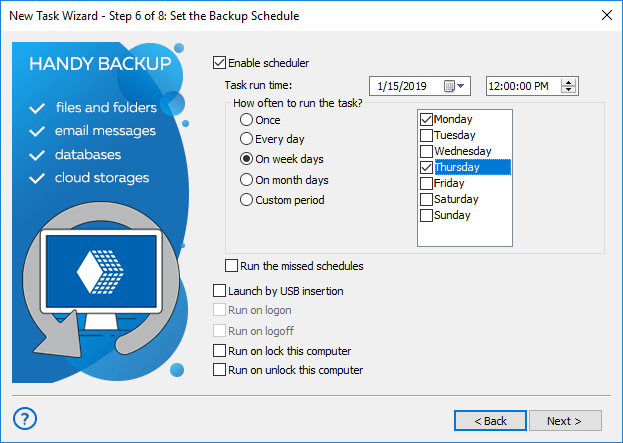
- On Step 6, schedule your task running. You can use some starting time and repeating period (well, about one time per day is enough in most cases), or run a task by some system event.
- Go to Step 7 to set up running external programs before or after a task. On this step, you can also set up email notifications about task activity!
- On the Step 8, name your task and finish the wizard. Well done! You just created a task for Typo3 backup.
Restoring from Typo3 Backup
Handy Backup allows making an automated task for Typo3 export, clone or just recovering. Make a recovery task on Step 1, then select your Typo3 backup folder on the Step 2 and highlight a file called backup.hbi, that contains all backup and recovery data.
Tip: You can make recovery for another destination by clicking "Change Location" on Step 3 (in advanced task wizard mode). You can feel free to organize Typo3 export to other servers. However, you must always use the same database plug-in for backing up and restoring (often the MySQL plug-in)!
Video Example
Handy Backup allows backing up Typo3 website via FTP, as well as using SQL database backup.
Note: Instructions in this video suggest that you already have Handy Backup installed on your computer. If you still have not done so, do not hesitate to download a copy of it.
