Disk Image Plug-in
The Disk Image plug-in allows creating and restoring snapshots of hard drives and individual partitions. It supports “live” disk imaging, i.e. allows performing the backup without stopping Windows.
Snapshots can be restored only to a “cold” hard drive that has no software running on it. If you want to restore a system partition, it is recommended to boot from a recovery USB drive. See Disaster Recovery Module for more details.
Prerequisites
The plug-in requires you to have Volume Shadow Copy Service running on your system.
Privileges
To use the Disk Image plug-in, Workstation must run from a user account with administrator privileges.
Plug-in File System
The file system provided by the plug-in is organized as follows:
- Top-level folders represent physical drives (hard disks) available for backup. Inside them, there always is a file called full drive image and a folder called Partitions. They have no attributes.
- The full drive image file is used to back up the entire drive as a whole. It has no attributes.
- Files in the Partitions folder allow backing up individual partitions and partition table. They have no attributes.
Files and folders in the plug-in’s file system don’t have any attributes, which means that when compared to other files and folders, they will be always considered as different. Incremental backup will always copy the entire set of data; if you want to optimize usage of disk space, use differential backup.
Format of Backup Files
As a result of backup, you will have binary snapshots of the objects you selected. At present, these images cannot be mounted or browsed (you can only restore them completely).
Backing Up
The Disk Image plug-in can only be used as a source of data for backup tasks. To learn more, please refer to Specify Backup Set.

To add an image to backup set, follow these steps:
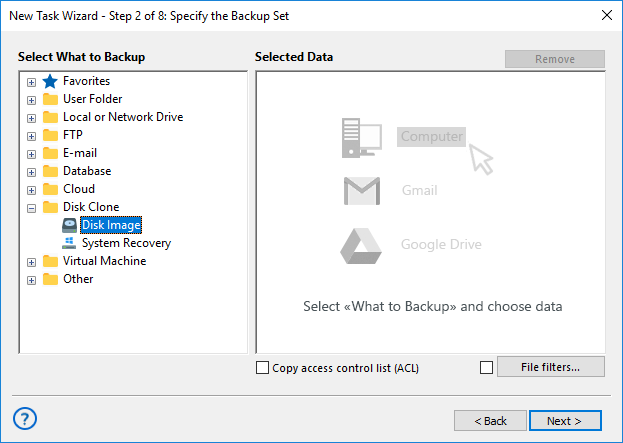
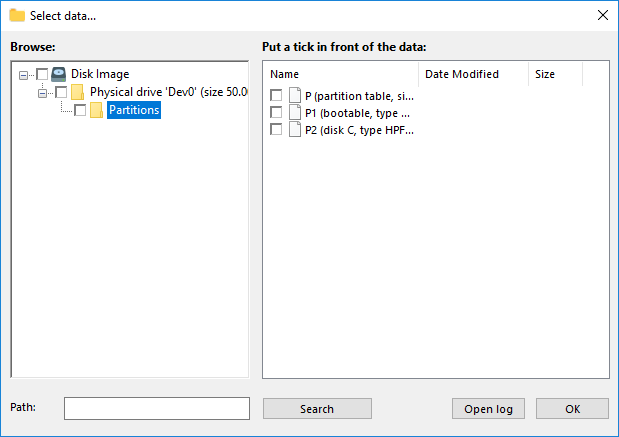
- On the left pane, click on the Disk Image plug-in in the Disk Clone group. The Select data... dialog will open.

- Check the boxes next to disk images that you want to back up.
Note: The full drive image file (located in the Physical drive folder) is used to access all HDD data, i.e. it also includes all objects from the Partitions folder. When adding data to backup, make sure you don’t do double selection.
- After finishing selection, click OK. Selected data appears in the Backup Set pane of the New Task Wizard.
Restoring
When restoring a disk image backup, target drive must be a “cold” media, i.e. have no applications working with it. When you run a restore task, the plug-in firstly locks the drive, then performs the copying, and then unlocks it.
To restore a disk image, follow these steps:
- Open New Task Wizard.
- Select Restore task, and then click Next.
- Browse for the index file (backup.hbi) located in the destination folder. Select it, and then click Next.
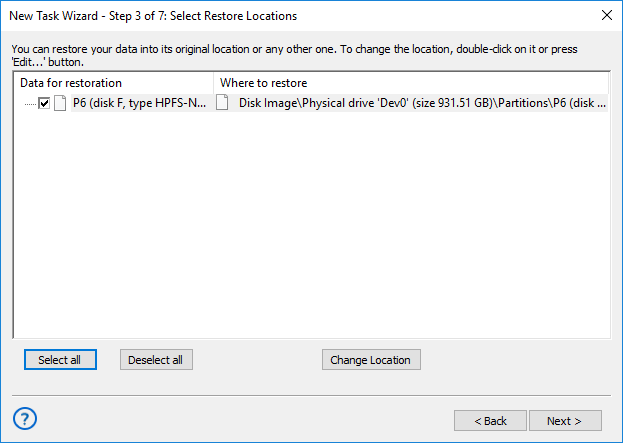
- In the Select Restore Locations dialog, verify the details of restoration.

If you want to restore a snapshot to a different drive, follow these steps:
- 4.1. In the Select Restore Locations dialog, select an object, and then click Change Location. The Change restore location dialog opens.
- 4.2. Select a physical drive and a new path, and then click OK.
Note: By restoring a snapshot to a different place, you can effectively clone your HDD.
After verifying paths of restoration, you need to select type of restoration, enter decryption password (optional), and name the task. These steps are not specific to the Disk Image plug-in. To learn more, please see Restore Task.
Tags:Image Backup, System Backup.