How to Backup SVN: SVN Backup Best Practices
SVN backup must be performed on a regular basis for all Subversion (SVN) repositories, as the loss of the complete list of versioned project data can be much more irreparable than any other data-related disaster.
So learning how to backup SVN is a serious matter for any developer or administrator.
SVN backup tool can be a simple script (typically used for SVN backup at Linux), but to give SVN backup best practices existed, experts and skilled users recommend using dedicated software solutions, such as Handy Backup, to apply one of these solutions as default SVN backup tool.
SVN Backup Strategy
As SVN is somewhat like a versioned backup system, the common strategy to backup SVN repository in Windows is creating a copy of SVN dump. Used as a part of a batch or script file, this dump command can force SVN backup multiple repositories.
The alternative strategy of SVN backup is copying of all SVN folders and repositories manually or by third-party backup automation software (e.g., Handy Backup). The latter way allows such things as SVN backup remote repository or downloading SVN backup to S3 cloud service provided by Amazon.
How to Backup SVN Using Handy Backup
Handy Backup allows SVN to backup multiple repositories, all at one time. It can place SVN backup to FTP, NAS or external USB drive, as well as perform SVN cloud backup to any commercial cloud service (SVN backup in incremental mode reduces the space required!).
Method One: Saving a Copy of SVN Directory
SVN repositories locate in typical Windows folders, allowing using these data as any typical directories containing different files. All editions of Handy Backup can copy a folder with all substructures to other place. To copy SVN folder(s) such a way, you may apply the following sequence of actions:
- Open Windows command line window. Do not use a "Run..." command instead – you may lose all of your actual output!
- Type the SVN command:
- Find the SVN root repository directory in the output data of the previous command.
- Open Handy Backup, and create a new task by pressing Ctrl+N or by selecting menu item. Select a backup task type.
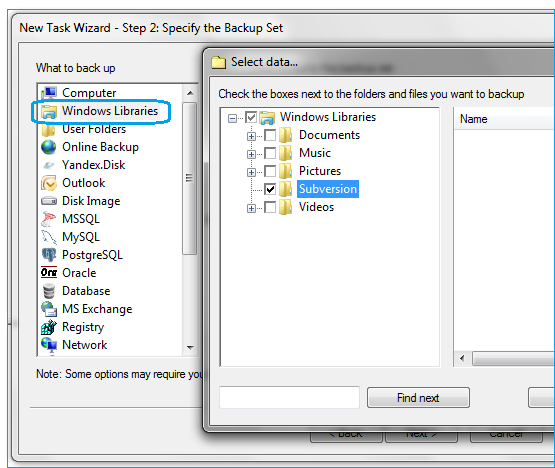
- Select "Windows Libraries" as the data source on the Step 2.
- Find the SVN directory (Subversion) and mark it with a checkbox to add it to backup list.
svn info

- Press "OK" and return to the backup task wizard.
- Select a "Computer" option. Find and mark all SVN folders selected by info command.
- Again, press OK and return to the task wizard.
- You may set up any other backup parameters, such as selecting the backup destination, making SVN backup incremental or differential, encrypting data or scheduling the task. These steps are not specific for backing up SVN; to learn more, please read the Handy Backup User Manual.
The backup task created by this way will copy data from your SVN repository root every time it will run. No other actions may be required after the initial task setup (if, of course, these are no needs for some drastic changes in the task architecture or tunings!)
Method Two: Saving a Copy of SVN Dump File
This method is almost identical to previous, but instead of SVN folder(s) content, the dump file (a sort of internal "backup" provided by SVN itself) will be saved as a copy by this method. To apply this method, do the steps described previously, with some differences listed here:
On a second stage, type the dump command instead of info command:
svnadmin dump [path-to-your-SVN]
where the phrase in parenthesis must be replaced with a typical Windows full path to your dump file.
On a sixth stage (selecting data from the "Computer" data source at Handy Backup), find the dump file(s) instead of the Subversion library to add to the backup data set.
Note: You may use the "File filters…" option when selecting data, to automate searching and adding SVN dump files masked by extension.
You may also add the dump command described above to the Step 7 of backup task wizard, writing it on an activated field called "Run a program before running the task". Due to the logic of the task, this command will be executed automatically every time before backup.
Other steps for this method are just the same as for backing up SVN directories. You can select the preferred strategy for achieving the full automation of your SVN backup.
Note of SVN Backup under Linux
Standalone editions of Handy Backup do not support Linux natively, requiring emulating Windows environment or copying backup data to other computers before performing copying via Handy Backup. However, network backup solution of Handy Backup can collect backup data from remote Linux machines!
To use Linux-based backup natively, install the Network Agent for Linux (the utility distributed with network editions of Handy Backup, running under OS Linux) to your remote Linux computer, and then set up the SVN backup task as described above via the central Management Panel.
Version 8.6.7 , built on November 26, 2025. 153 MB
30-day full-featured trial period
Read more:
