Managing Remote Tasks (for the Server Network Edition)
To create a new task with the Server Backup edition, you must have the pre-installed Management Panel on the central console machine and the configured Network Agent of an appropriate type on a remote computer. When you have the both component, you can easily create a remote task.
Creating a Sample Task for Remote Data Backup
This example explains how to make a task for auto MySQL backup from a remote server to a network NAS. This class of tasks is one of the most popular backup implementations for different corporate networks.
To make a remote backup task, please do the next things:
- On the Management Panel, click "Create".
- Select a backup task type on the first step. Toggle on the advanced mode checkbox to allow all options, and click "Next" to go to Step 2. Here you will select appropriate backup data.
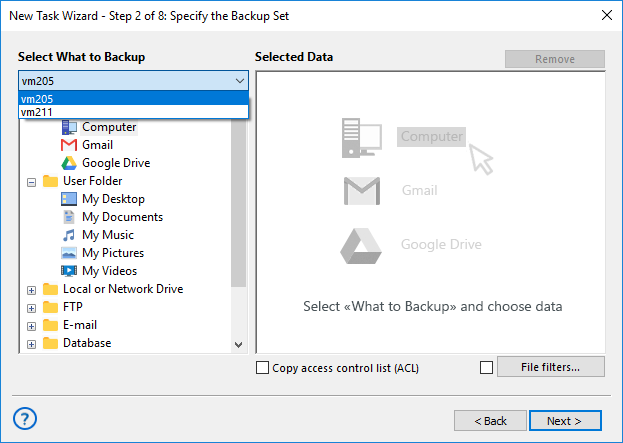
- Select a remote machine from the drop-down list in the upper left corner.

Note: The Server Network edition always works with a local machine with the Management Panel. Handy Backup will automatically choose a local machine unless you select a different computer from a drop-down list.
You will have a different set of available data plug-ins, depending on the type of a Network Agent installed on a local machine.
- The Network Agents for Workstations can copy files, folders and drive images.
- The Network Agents for Servers also back up databases and virtual machines.
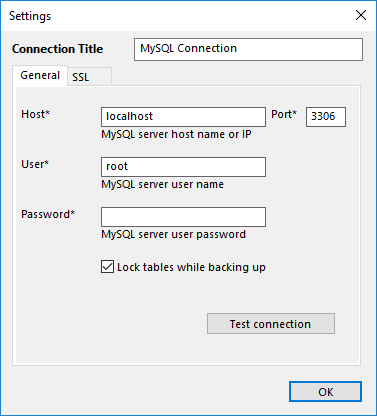
In this case, you will need a Server agent installed on a remote machine. After choosing a computer, click onto the "MySQL" plug-in name in the "Database" group. Click "Create a connection". You will see the MySQL connection dialog.
- Enter the new connection parameters (connection name, server name or IP, user login and password) into appropriate fields. Click OK.

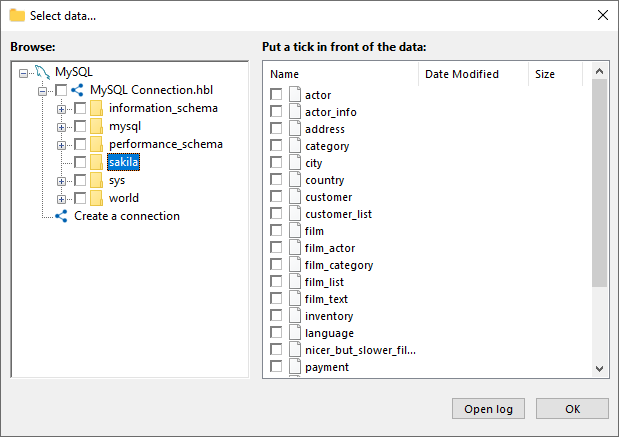
- Click onto the new connection name in the data selection dialog. Select or unselect particular MySQL tables by marking checkboxes against the names of these tables. Click OK when finished. Now click "Next" and go to Step 3 to select storage for your remote backup.

File system provided by the MySQL plug-in. Folders are databases, files are tables.
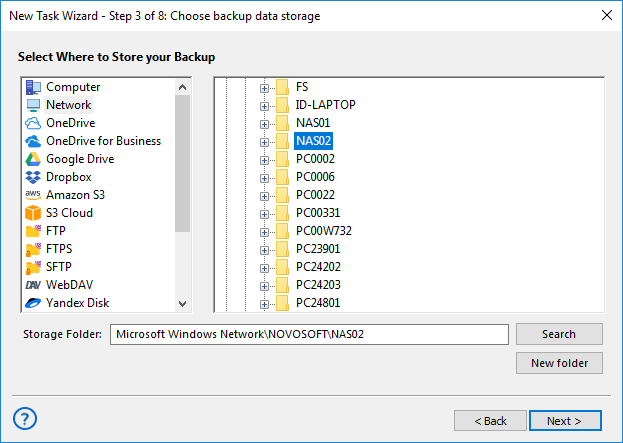
- In this example, we will use the NAS storage unit as a backup destination (you can read more about supported storage types). Select a remote computer from the drop-down list on Step 3, and then click onto the "Network" plug-in name.
- In the list of available network resources, select an appropriate folder on a NAS server.

- Click "Next" to continue creating a task. All next steps will tune up your new task in details. You can skip these steps just by clicking "Next" until the final step; please read more about task setup in this manual.
- The final step allows you giving a name for a new task and viewing briefly on all its parameters. Click "Finish", and a task will run automatically, unless you turn the appropriate checkbox on Step 8 off.
Tip: The simple task wizard mode allows skipping Steps 4 and 7, as well as reduces some control options on other steps. This allows creating simpler backup tasks quickly, making no distractions by unused options and controls.
Recovering Data to a Remote Computer
Data recovery on a remote machine is as easy as network backup. Note that we strongly recommend stopping all MySQL services before restoration, for avoiding possible transaction data loss.
To restore the information to a remote machine, you can just right-click on backup task name in the main window, and select "Restore…" from a context menu. You can also creating a more complex, detailed recovery task.
- Create a new task and select recovery on Step 1. Turn on an advanced mode if you need it.
- On Step 2, select a remote computer to restore data from a drop-down list. Go to your NAS storage with the "Network" plug-in, and select a folder containing backups.
- Choose the file hbi here, and then click "Next".
- On Step 3, select data to restore. In addition, you can choose a new data location in advanced task wizard mode by clicking "Change Location…" (for example, to clone or mirror MySQL databases).
- Set up additional steps of data recovery, as described in the User Manual for restoration tasks.