WebDAV Backup Software Client
WebDAV backup entails using its data transferring protocol as a data source, destination, or for bidirectional syncing. To implement this method, Handy Backup offers a client plug-in for WebDAV, facilitating backups in both directions. For users interested in exploring the functionality of WebDAV sync, Handy Backup offers a free 30-day trial version. Experience seamless synchronization and efficient data backup by downloading the trial version today!
Version 8.7.2 , built on June 23, 2026. 152 MB
30-day full-featured trial period
Benefits of WebDAV Sync and Backup Using Handy Backup
Quick and Convenient WebDAV Backup Software
Handy Backup enables WebDAV backup in all editions via the dedicated sync plug-in, managed by a user-friendly, modern graphical interface (GUI). The new task wizard offers two modes: simple for basic backup settings and advanced for comprehensive synchronization or backup.

Scheduling WebDAV Sync Client Tasks
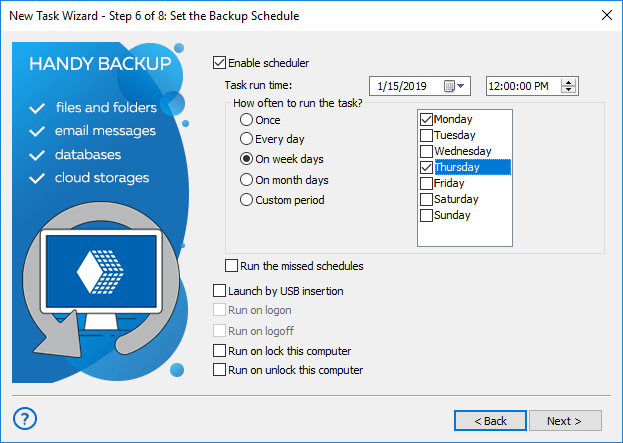
Within Handy Backup, you have the flexibility to schedule any backup or synchronization task using the WebDAV protocol to commence at a designated time interval, ranging from minutes to months. Moreover, the advanced task wizard mode empowers you to initiate data transfers to or from the cloud storage based on system events.
Secure Data Transfer to WebDAV Server
In addition to utilizing a secure data transferring protocol, you can always compress and/or encrypt your WebDAV backup data using an internal tool, and decrypt your archives during recovery. It's worth noting that Handy Backup retains unencrypted backup files in their native format, allowing you to use these files without the need for recovery!
Example Scenarios for WebDAV Server Backup and Sync Tasks
The technology of WebDAV backup and sync enables connections to numerous cloud services. For certain clouds (such as Dropbox, Box, OneDrive, etc.), Handy Backup offers its own plug-ins that do not require WebDAV client software. However, many other private and public clouds require WebDAV for connection.
- For instance, you can set up a backup to a private OwnCloud server using WebDAV.
- Another scenario involves a popular service that doesn't have a plug-in in Handy Backup but supports WebDAV. Examples include not only cloud services but also cases such as WordPress backup.
- Lastly, the WebDAV HTTPS or HTTP protocol is simply an extension of HTTP, allowing you to use WebDAV client software to access various web resources (e.g., for downloading and uploading files during website backup or CMS management).
Comparative Analysis of Backup Protocols for Data Transfer
Explore the advantages and limitations of various backup protocols used for data transfer, including WebDAV, FTP, SFTP, SCP, and Cloud APIs. This analysis aims to assist users in selecting the optimal protocol for their backup requirements by providing a detailed comparison.
| Advantages | Disadvantages | |
|---|---|---|
| WebDAV Backup | Supports secure data transfer over HTTPS. Advanced file management features. Better integration with web-based applications. |
Slower than other protocols for large file transfers. More complex to set up and configure. |
| FTP Backup | Simple and widely supported. High-speed transfers for large files. |
Lacks built-in security. Limited file management features. |
| SFTP Backup | Highly secure data transfer. Faster and more reliable for large files. |
Requires SSH access and configuration. Less user-friendly for non-technical users. |
| SCP Backup | Very fast and secure data transfer. Simple and efficient for direct file copying. |
Limited to direct file transfers. Lacks advanced file management features. |
| Cloud APIs Backup | Optimized for specific cloud services. Advanced features like lifecycle management and access controls. |
Vendor lock-in. Requires more development effort to integrate. |
Recommended Solution
Lifetime license

Handy Backup Professional
The Professional solution empowers users to backup WebDAV data and facilitates recovery for nearly all user-level data. It stands as an exceptional choice for backup and sync software option, catering to IT professionals, experts, and advanced users alike!
Utilizing Handy Backup as WebDAV Backup Software
To create a straightforward WebDAV backup task, please follow the instructions below:
- Begin by creating a new task, either by clicking "Create" on the management panel or using the Ctrl+N keys.
- On Step 1, choose "Backup". Here, put a checkmark in the "Advanced Mode" box to proceed in advanced mode. Then, click "Next".

- In Step 2, expand the "Cloud" group and select "WebDAV".
- Click on ""Create a connection…"". This will open a WebDAV server connection dialog.

- Complete all fields to establish a connection to your specific WebDAV server.
- Enter a name for this specific connection in the "Connection title" field.
- Input the server name or IP address into the "Server Name" field.
- Configure the port. The default port for WebDAV is 443 (over SSL) or 80.
- Provide your username and password in the respective fields.

- Click "OK" and return to the Step 2 window. Here, select the connection name.
- In the "Select data..." dialog, check the box next to the name of each piece of data you intend to back up. Then, click "OK" and subsequently "Next" to proceed.
- On Step 3, choose an appropriate data storage service for your backups. The left panel displays a list of available storage plug-ins.
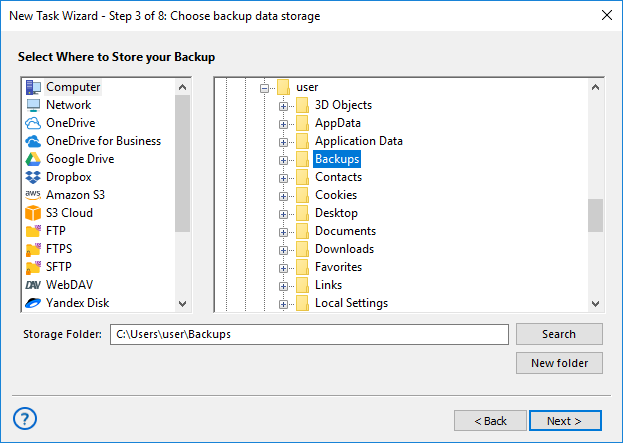
- In the storage selection dialog, select a folder where you will store your backups. Then, click "Next".
- On Step 4, compress and/or encrypt your WebDAV backup data if desired. Proceed to scheduling your task on Step 5.
- Now proceed to the final Step 6 by clicking "Next". Here, you can provide a name for your task and review all the task parameters.
- Click "Finish" to exit the task wizard. Your task will start immediately if you select the appropriate option on Step 6. Otherwise, you can run it manually or wait until the scheduled time.
Advanced WebDAV Sync and Backup Features
By utilizing the "Advanced Mode" in the task creation wizard, you gain access to numerous additional options for WebDAV backup. These include partial (incremental, differential, or mixed) backup, versioning, timestamping, executing external programs before or after a task, and triggering tasks based on system events.
Currently, there are numerous WebDAV storage options available. Handy Backup also offers extensive backup capabilities, supporting various physical, virtual, and cloud environments.
Version 8.7.2 , built on June 23, 2026. 152 MB
30-day full-featured trial period
Syncing and backing up with Handy Backup software is a simple and convenient task!
Experience it yourself by downloading a free trial version for 30 days!
Additionally of interest: