Program Installation and Usage
Updated on June 24, 2026
Applies to: Handy Backup
Why can't I see my tasks in Handy Backup?
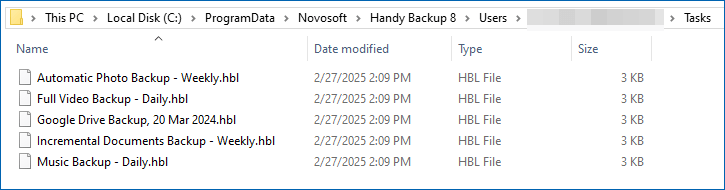
If your tasks are not displayed, make sure you are logged into Windows with the same user account that was used to create the backups. If you don’t remember which user account was used, follow these steps:
- Go to the following location:
C:\ProgramData\Novosoft\Handy Backup 8\Users
Note: By default, the ProgramData folder is hidden in Windows settings. To make it visible, enable the Hidden items option in File Explorer.
- The Users folder contains data for each Handy Backup user on your computer.
- Find the user who has backup tasks.
- Log in with the user account that has the created backup tasks.
This should help you find and regain access to your backup tasks.
If you have any questions about Handy Backup, feel free to contact us at [email protected] — we’ll be happy to help!
Is it possible to backup an open file?
Yes, it is completely possible. Software can back up your files in a “hot” mode when it saving copies of your files already opened by another application. This is very useful option, as you can keep the workflow of data when you perform the backup. It can be most actual when you backup databases. The engine used for this technique is a Volume Shadow Copying service (VSS) performing the snapshot of any file already opened.
These are conditions under that the “hot” backup is available:
Is It Possible to Selectively Restore Files from an Encrypted Archive Copy?

Yes, no problem. To create a task to restore files and folders selectively from an encrypted backup dataset, please follow the next simple instruction:
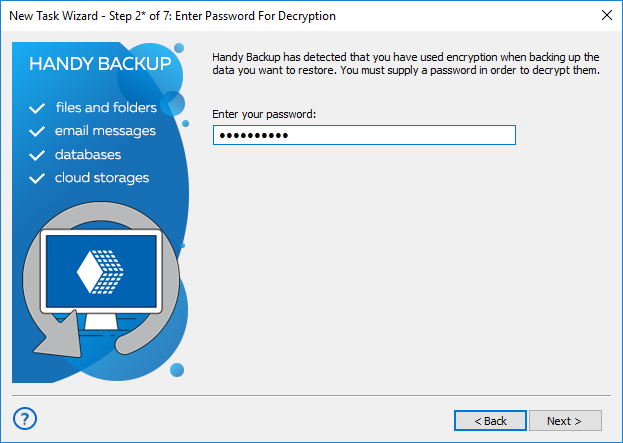
- Create a new recovery task and mark the "Advanced mode".
- Select backup storage at Step 2 and click on a backup index file backup.hbi.
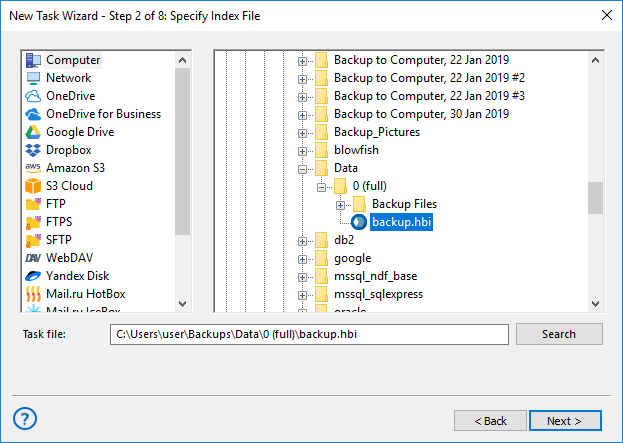
- On the next step enter a password for your encrypted copy.
- At Step 3 select files and folders to recover.

- You can also change the recovery location for selective recovery of files and folders from an encrypted archive by clicking on the "Change location" button.
Note: You cannot select a new destination for Outlook and MS Exchange plug-ins. Also, for special data types such as database and virtual machine plug-ins, a destination must match a source plug-in (e.g., you can restore a MS SQL backup only to another MSSQL server, etc.).
- Continue creating a task as described in the User Manual.
Why the program performs full backup, even though I have set it to perform incremental backup?
Current version of Handy Backup performs full backup in the following cases:
- If it is the first time you run the task
- If you changed properties of the task
- If data you are backing up can’t be backed up incrementally
In Handy Backup, incremental backup is performed on file level, i.e. it doesn’t save changes smaller than a file. For image-based backups this results in a full backup made virtually every time you run the task. If you want to back up differences on byte level, use differential backup.
Note: Incremental and differential backup in Handy Backup is not available for tasks created with plugins from the Database, Disk Clone, and Virtual Machine groups. For these data types, a full backup is always performed to ensure data integrity and correct recovery.
Sometimes you need to change properties of the task. After this, Handy Backup will also perform full backup, so none of the data can be lost.
Read more:
See how Handy Backup outperforms incremental backup scripts...
Check out how the software manages Windows 8 restore...
Why I Cannot Backup Mapped Drives if I See these Drives on a Desktop?
Sometimes user cannot access mapped drives to back up the information. Therefore, he sees these drives on a desktop or through standard file-managing tools (such as Windows Explorer). How to solve this problem?
Newer versions of Handy Backup always can see your mapped drives. To ensure that, please check an option for restoring connections with your mapped drives when re-entering the system, when you are mounting a mapped drive through Windows.
To see the list of mapped drives, open the Windows Registry and find a section named
“HKEY_USERS\[userid]\Network”
where the [userid] is a substitute for a current user ID number. You will find a list of your mapped drives in this section.

Another problem can emerge if you are running Handy Backup as a service under the “Local System” account. Make sure that you start your instance of Handy Backup as a current user, to guarantee that Handy Backup will see the same set of mapped drives as you have on your desktop.
To find a list of running services and their owners, open the “Control” section of the “Computer” item on a main Windows menu. Here find the services subsection, and open the list of Windows services currently running. The backup client service must run itself under your current user account.

These are the two ways to achieve the last statement:
- Try to map all your network drives as a user who are running a backup client instance.
- A less desirable method is to restart a service (NSBackupServer) or a workstation agent (Novosoft Backup Network Workstation 7) under a user who owns the mapped drives.
How can I restore a specific file or folder?
To restore a separate file or folder from a backup set, please make a new recovery task. On Step 3, "Select restore location", click "Deselect all" to remove all files from a recovery list.
Now use the left panel for file browsing and find a file or folder that you need. Mark a checkbox against a name of this item. Note that when you mark a subfolder, it will also mark all items inside this subfolder, both files and folders.
Changing Recovery Location
In the advanced task wizard mode, you can also select a new recovery location for a separate file or folder. To do it, please use the next instruction:
- Create a new restoration task and select an advanced wizard mode on Step 1.
- Select a recovery dataset and go to Step 3, "Select Restore Locations".
- Select a single file or folder as described above.
- Click "Change Location" to open a new location dialog.
- Select a new location for data recovery.
- Some plug-ins (e.g., MS Outlook or MS Exchange) do not accept changes for recovery location. You must always restore data from these plug-ins to original places.
- You can also recover some complex data types (such as databases and virtual machines) into a new location, but only under the same plug-in. For example, you can recover a MS SQL Server database to another MSSQL server only.
How can I restore a folder to another PC?
There are several ways to restore your backup to a different computer:
- Restore your backup to a shared folder on a networked PC. To do it, simply specify the remote folder as a destination of a restore task. Before you run it, make sure that you have the privileges to write new files in that folder.
- Grant the second computer network access to the folder that contains your backup and Handy Backup index file. Install Handy Backup on that computer. Create a new restore task which will use the backup on the first computer as a source of data (i.e. select index file in a networked folder). By default, the destination folder will have the same path as it was on the original computer. If you want to restore data to a different folder, specify it on Step 3 of restore task creation. For more detailed instruction, refer to Restoring Data in the User Manual.
- Use Handy Backup Server Network - an enterprise backup software of Handy Backup which is designed to manage backups in a corporate network. To restore a backup to a network workstation, this workstation must have client software (Backup Network Workstation) installed on it. To learn more, please refer to Network Editions in the User Manual.
Why I Can’t Write Files in a Single ZIP Archive During Incremental or Differential Copying?
The answer is simple. You can′t move differentially or incrementally copied files to a single ZIP because the basis of both methods is file comparison.
In other word, incremental and differential backup (and recovery) must compare separate files to work properly, and it is impossible when you create a single archive.
How to make backup tasks execute one after another?
To configure tasks for automatic execution one after another, you need to chain these tasks to each other. Please do the following steps to achieve it:
- After creation the tasks, go to the "Backup Task Properties" section of one of them (task 1 on the screenshot below).
- In the tab "Actions before/after" select the option "Run a program after running the task";
- Then click the button "Browse..." and select the path to "hbcc.exe" ("C:\Program Files\Handy Backup 8\hbcc.exe");
- At the end of the path enter the name of your other task: -e "your-task" ("C:\Program Files\Handy Backup 8\hbcc.exe" -e "task 2" on the screenshot below)
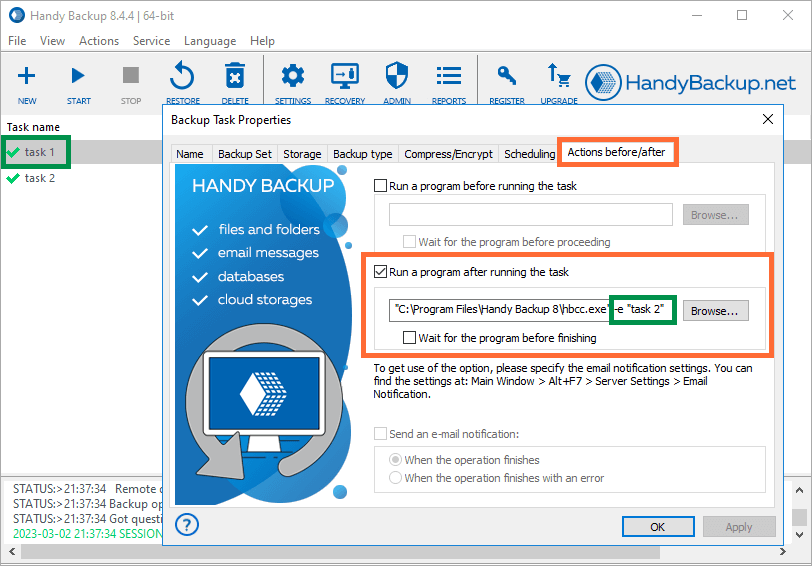
- Click Apply and then click Ok.
Done, the tasks are configured to be automatically executed one after the other.
Related Pages:
Backing up Data Accessed Only under Administrative Privileges
For security reasons, Windows may block access to certain computer data. The following operations, under some systems, may require you to have administrative privileges:
- HDD image backup and restore. Access to the list of the computer’s physical devices, as well as their backup and recovery are unavailable to non-administrators.
- Windows registry backup and restore. Some system registry keys have protected from unauthorized access.
- Import/export Handy Backup settings. To import and export Handy Backup’s settings, you need to be an administrator.
How to Enable Advanced Functions (If You Have Problems)
In order to use disk imaging, registry backup and to import/export program configuration, you need to configure Handy Backup’s start-up settings. Please follow these steps:
- Make sure that your user account is a member of Administrators group.

- Close Handy Backup and Handy Backup Agent (in system tray).
- Restart Handy Backup.
Tip: You can just run Handy Backup as administrator from the Windows main menu or from an application context menu that shows on right-click on an application icon.
Program hanging when changing a task through the Task Properties menu. What should you do?
The program hangs due to the problems with the plugin connection used for performing the backup task.
If the program hangs when switching from the "Backup set" tab to the "Storage" tab through the "Task Properties" menu, follow these steps:
- Exit the Handy Backup program via the “File” menu or using the program tray.
- Navigate to the following path using Windows File Explorer:
C:\ProgramData\Novosoft\Handy Backup 8\Users\USER\Plugins
where USER is the system user.
- Choose the plugin folder and delete any unnecessary connections.
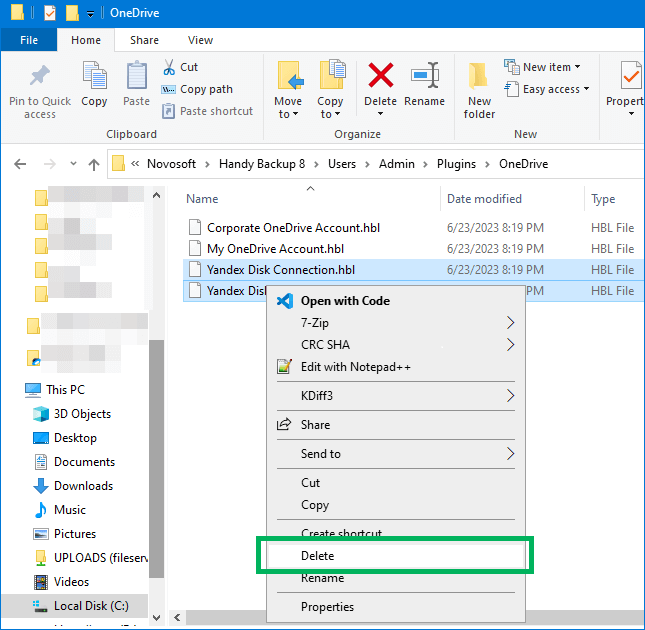
For example: we selected a folder that contained connections to OneDrive and deleted any unnecessary files.
- Run Handy Backup and continue editing the task.
If the problem is not resolved, please contact us at [email protected] and we will try to help you.
What to do if the USB flash drive with Disaster Recovery doesn't boot?
Ensure that the USB flash drive is formatted with the MBR partition scheme and is set to target the BIOS system. If the USB drive still fails to boot, try reformatting it with these settings:
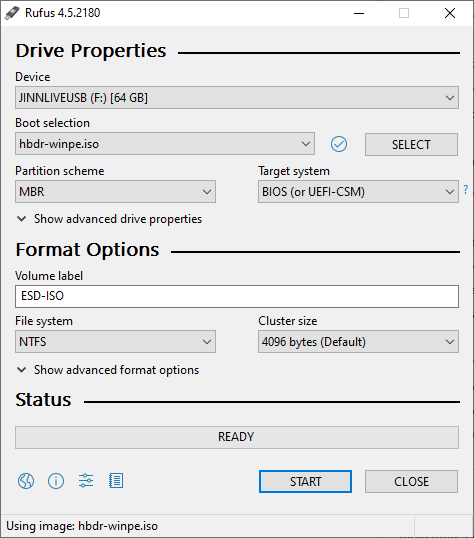
If instead of booting from the USB flash drive, Windows starts or the system returns to the BIOS, check your BIOS settings. Ensure that the boot order in the Boot section is correctly configured: the USB drive should be set as the first boot device!
To enter the BIOS, press one of the following keys immediately after powering on your computer (it’s often helpful to press the key repeatedly): F2, ESC, DEL, or other F keys, depending on your motherboard manufacturer. In the BIOS itself, navigating is straightforward. You can use the arrow keys and F keys to move through the menus and adjust settings. Typically, F5 and F6 are used to move devices within the Boot menu. To save changes, press F10, then Enter to confirm.
Next, check another BIOS setting related to UEFI. UEFI is significantly different from traditional BIOS in both the boot procedure and interaction with the operating system. Sometimes UEFI can load the operating system instead of the bootable USB drive (such as those using grub4dos or syslinux), effectively ignoring the USB. To resolve this, locate the UEFI-related setting in your BIOS and adjust it accordingly.
For example, in the ADVANCED tab under System Configuration, you may find an option called Boot Mode. If this option is locked for editing, look for a way to unlock it. Go to the Security tab and disable Secure Boot. Then, return to the UEFI settings and disable UEFI mode.
Different BIOS versions may have various names for these settings, but they usually include abbreviations like UEFI, Legacy, or Legacy Boot, indicating compatibility modes. Pay attention to the descriptions in the right column and look for these terms.
For instance, in our BIOS, the description includes the word "Legacy." To select this compatibility mode, choose the CSM (Compatibility Support Module) option. Once you disable UEFI mode, all bootable USB drives should work without issues. However, remember to re-enable UEFI mode in the BIOS after working with the USB drive to ensure your system continues to operate correctly as before.
BIOS and UEFI can vary across different motherboards, but using key terms such as Boot, UEFI, Legacy, and CSM will help you locate the necessary settings.
Also, in the "Hard Disk Drives" section, try setting the name of the USB flash drive in two places: 1) under the USB drive's name and 2) under the HDD name. In other words, specify the USB flash drive in all relevant entries.
See also:
I cannot install the program on Windows XP and Server 2003
The latest version of Handy Backup no longer supports Windows XP and Windows Server 2003.
You can use the previous version of Handy Backup that supports Windows XP and Windows Server 2003. You can also look through all the old versions of Handy Backup.